Monday, 12 November 2012

Week 15

Theme: "Final Design"

Introduction
We made it! The team eventually arrived at the final stage of the design process. My obligations was to design and create the two A2 presentation boards along with the final renders of the main substation. The other members in the design team were delegated separate tasks in order for the team to work effectively and complete the required objectives in time. Furthermore, the team used online collaboration platforms including Dropbox and social media sites such as Facebook to coordinate our efforts and provide each other with instant feedback.  

Final Design Deliverables
Listed below are all my completed tasks and set deliverables.


Listed below are the other team member's work and the final presentation.


Conclusion
In summary, I thoroughly enjoyed this semester's project. I was able to improve my skills as a designer in the areas of 3D modelling, sketching, presentations and board layouts due to effective collaboration with the design team and in-class tutorials. I found it extremely beneficial to receive constant support from the tutors due to the fact that they provide a great insight into design related issues and solutions as well as offer an industry perspective. I look forward to next year's design projects. See you then!

Week 14

Theme: "Solidworks"

Introduction
This week the design team outlined the final deliverables for the semester project. The outcomes which needed to be achieved by the end of the week included, developing a fully resolved interaction concept design, designing a 3D prototype model using CAD, creating presentation boards and making two short films which will examine the form and overall functionality of our design. My task for this week was to design the main substation and model it using a 3D modelling program called Solidworks. My main aim while designing the substation was to make sure that it addressed the user's needs and was both relevant and useful for the context. In addition, I believed the substation needed to be seamlessly integrated into the user's scenario in order for it to be effective, helpful and actually improve the experience for the user. In order for me to achieve this I developed my own phrase "purpose driven design" to help guide my design process and stay focused.

Firstly, I decided to conduct preliminary research on the context to determine what properties the main sub station would require. 

Context Research


  • Indoor/Outdoor working conditions. Therefore, consider portability and materials;
  • Dirty floors with various chemicals, dust and grime;
  • Constant need to utilize floor space. Therefore, floor space needs to always be clear in order to ensure a safe working environment. The main substation will most likely need to be placed on the wall or carried by the site manager to make sure there is always someone monitoring the substation and the information it is collecting/displaying. However, after a discussion with the team they informed me that the device must remain on the floor to comply with industry standards;
  • Electrical wires from various machines and equipment can usually be a hazard and as a result, could affect the positioning of the main sub station;
  • Noise disturbance could reduce the effectiveness of the main sub station. Therefore, the substation must remain visual and relatively close by at all times;
  • Majority of the time the worker is looking down on the floor and unaware of what is going on around them; and
  • The overall context is relatively dangerous, loud and can be overcrowded at times.
Based on these findings and observations, the main substation is required to have the following features/aspects:
  • Highly visible from all directions;
  • Robust;
  • Lightweight;
  • Durable;
  • Portable and easily transportable; and
  • System of LED lights to notify the manager.
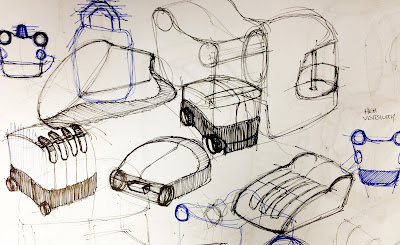
Listed below are a few conceptual diagrams and form development sketches relating to the above research.


The main substation only has four LED emitting nodes. A hierarchy system is used in the substation to notify the site manager as to which workers are experiencing the worst pain or discomfort. The idea of only using four LED emitting nodes is to eliminate the need for the manager to monitor and keep record of all their workers. Using this system the site manager is able to only focus on the workers that require their attention immediately. 

Furthermore, the main substation directly links to the glove and power socket. Therefore, all three of these components form a system, a system of information which is transferred from one product to the next. Each time information sis transferred it is evaluated by both the user and the product. Depending on the user's behaviours and experience the user or product will act accordingly Each component is a vital link to ensure the information is correctly analysed and acted upon. 

Over the course of the week I with the help of Nick Kallinicos designed and developed the main substation. Below are the technical drawings and associated screen shots showing the different stages of the design development.


Saturday, 3 November 2012

Week 13

Theme: "Hand Anatomy"

Introduction
This week our design team focused on refining our current glove concept. The main objectives for this week was to begin creating a style and types of materials and to link the glove and the corresponding notification system. Other proprieties included developing the features and technologies which will be integrated into the glove such as flex sensors, grip pads, breathing tabs and an accelerometer. 

Research 
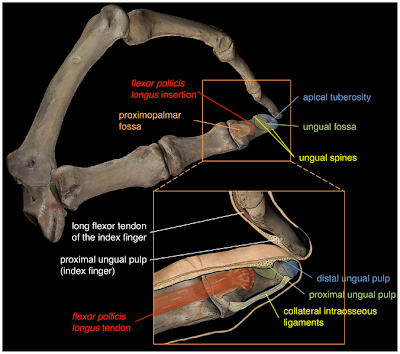
In order to understand more about the different types of grips and how the anatomy of the human hand plays a significant role, I decided to research tennis grips. Cooper (2012) states a popular and adequate point of reference on the hand is the space between the thumb and index finger. The image below shows the space between the two regions and how they intersect with the palm of the hand.


Tennis players prefer to use the base knuckle of the index finger as its position corresponds to the center of the palm. Due to the fact that people are use to sensing the direction that their palm is facing, the palm is able to intuitively sense the direction the racquet is facing. The diagram below details the 'V' space on the hand which is essentially the base knuckle of the index finger and whats known as the 'Heal-pad' which is the region directly opposite the thumb and below little finger. 


This information has proved to be highly beneficial to this semester's project as it outlines important regions on the hand in relation to grip and performance. The most significant aspect of this research explains the versatility of a tennis racquet's grip and how it allows players to constantly adjust to the situation. Similar to our project, it is important for the design team to understand exactly where to place the grip pads which will provide the user with a full range of motion, improved comfort and a great deal of versatility to use numerous types of tools and equipment. Given the fact that the user group is constantly using different types of tools both large and small, the user requires a glove that can adapt and provide the best performance for each situation. As a result, the placement of the grip pads must address specific areas on the hand that will benefit the user's control and ability. 

The fact that tennis players are continually using a variety of different strokes including backhand, forehand and volleys, it is the responsibility of the grip to provide the player with multiple options to adjust quickly and ensure correct technique. Therefore, on the basis of this research, I believe our team should employ the same principles used to design tennis grips.  

In terms of anatomy of the human hand, there are no muscles inside the fingers. In fact the muscles which control the finger joints are located in the palm and the mid forearm. These muscles are connected to the finger bones by tendons which control the movement of the fingers. After prolonged use of heavy equipment the user will begin to experience pain and discomfort as a result of muscles in the palm and mid forearm become fatigued and sore. Thus, the glove will need to place grip pads according to areas of the palm that provide the most power generation and control of the fingers to maintain comfort and reduce pain.

In total, there are ten muscles that make up your hand grip. Three of these muscles are located in the forearms and wrists and the other seven are located in the hands themselves (AthleticQuickness, 2012).
The image above indicates the locations of varies superficial hand grip muscles of the left hand.
The image above details the locations of the deep hand grip muscles of the left hand.

In addition, I have done further research into specific muscle groups that provide different types of support and control to the thumbs and fingers in order to identify the best possible locations for grip pads. The three muscle groups included in this video are Adductor Pollicis, Abductor Pollicis Brevis and Abductor Digiti Minimi (hand).


The adductor pollicis muscle is considered a forearm muscle and is involved in the movement of the hand and fingers. However, its specific function is to adduct the thumb's carpometacarpal joint.

The abductor digiti minimi (hand) muscle is a particularly strong skeletal muscle and its main function is to pull the little finger away from the other fingers. This process is known as abduction. The muscle plays an integral role when the hand grasps an object tightly as it helps to flex the metacarpophalangeal joint. 

The main function of the abductor pollicis brevis is to abduct the thumb, or move it away from the palm. This muscle is also involved in the extension as well as opposition of the thumb.

These three muscle groups will play a significant role in regards to where each grip pad will be located on the hand.

Hand Sweating
There are two types of sweat glands in the human body,they are the Eccrine sweat glands and the Apocrine sweat glands. The sweat glands which I will focus on for the purpose of this design project are the Eccrine sweat glands. Humans utilize Eccrine sweat glands as a primary form of cooling and body temperature regulation. These glands cover the majority of the body, but are highly concentrated on the hands, feet and forehead. More importantly, this type of sweat is clear and odorless as it is mostly comprise of water and salt.Below is an image of the Eccrine sweat glands.


Design Solutions
Based on this research I have developed my own concepts relating to sweat glands and different type of grip.

Firstly, I decided to look into where I would place breathing pads to provide the user to improve the palm's ability to breath and perspire effectively. The hand silhouettes below detail exactly where the breathing tabs will be located. The idea behind the positioning of these tabs is based on research. The back of the hand has four slight raised breathing tabs underneath each knuckle. These tabs are raised so when the user grasps a tool they will be automatically compressed and therefore draw out the moisture in the hand and allow the palms to stay cool and dry. The perspiration will be squeezed out through the tabs located on the top of the hand. Breathing tabs are also located around each finger as much friction and movement is associated with these regions and as such will generate heat. In addition, I sort to address the issue of blisters and calluses by making the material on the back side and top of the hand see-through to allow the user to monitor the development of any blisters or bruising. 
In terms of grip pad placement, the image below illustrates where grips will be place. Again, the justification for their positioning is based on human anatomy research and tennis grips.


The placement of the grip pads have been located according to specific muscle groups and their functionality, common regions used to grasp objects and surface areas with the optimine strength and control performance. Furthermore, the entire underside of the thumb has been incorporated with a grip due to the thumb's prehensile nature. John Napier proposed two primary prehensile grips: the precision grip and the power grip. The power grip is when the fingers clamp down on an object and the thumb makes a counter pressure. The precision grip is when the fingertips and thumb press against each other. The image below is an example of a precision grip. Based on this, a grip has be positioned on the index finger to help provide additional support as well as versatility for the user.


One example of a precision grip is opening a jar only with your fingertips. This information highlights the need to place grips along the fingertips to provide the user with extended capabilities while grasping complex tools. The image below details these specifics.


References: APA
Cooper, J. (2012). Simple Guide to Forehand Grips: Planes of the Racquet Handle. Retrieved from
http://tennis.about.com/od/forehandbackhand/a/simplefhgrips.htm

AthleticQuickness. (2012). Sports Anatomy Lesson: Hand Grip and Wrist Muscles. Retrieved from http://www.athleticquickness.com/page.asp?page_id=102


Monday, 22 October 2012

Week 12

Theme: "Finishing Touches"

Introduction
After several weeks of concept development, research and team meetings, our design team eventually decided on a final design.

The team initiated a design freeze and worked on a process of selecting designs and determining which concepts offered the best potential and which concepts met the deliverables set out in the client brief. In order to achieve this, the team's concept design phase was intense and repetitive. However, we were able to arrive at a well thought out and innovative product. 

Product 
The final product is a system of integrated components that collect, store and evaluate information all for the purpose of improving work place health and safety, employee efficiency and employee's mental and physical well being.

The final design is a set of interact gloves and a central communication hub. The gloves are worn by the employees while they are working and using various tools and electrical equipment. The context is a local construction site and the employees are floor preppers.

In terms of behaviour, the gloves act as an 'external sensory organ' which detects when employees are experiencing pain or discomfort. The sensor points are located according to people's natural behaviours when they are experiencing symptoms of pain.

The team conducted a brainstorming session to identify ways in which everyday people communicate they are in pain or experiencing a injury. The images below are a synopsis of what our team believed were the most common areas people hold, clench, touch and squeeze when they are in pain. The main regions of the body that were focused on included the hand, wrist and upper forearm.


All of the images above more or less focus on the region between the index finger and the thumb. Through further discussion the team arrived at the conclusion that the index finder and the thumb are heavily relied because they provide people with effective grip and reliable support. In addition, the index finger and thumb also offer people dexterity and an ability to adapt to different situations. For example, because people rely so heavily on their thumb and index finger they end up placing a tremendous amount of strain to this particular region and as a result, people try and compensate by nurturing this region with their other hand. This discussion proved to be highly resourceful as it clarified why people experience symptoms of pain in this region of the hand.

If the user experiences pain they are able to squeezes this region and the site manager will be immediately notified and made aware of the information. This information can then be used by the manager to hold regular rest periods to allow workers to rest and regain full range of motion in their hand.

The gloves, collect information, this information is then relayed via visual cues to alert employees and make them aware of their surroundings and individual conditions. The gloves detect vibration which is produced from the electrical tools they are using. Once the glove detects too much vibration a warning light comes on to make the employee aware that they are causing excess strain and stress to their body. If the employee decides to ignore the warning signs, there is built in radio-frequency identification (RFID) system which turns the tool off. An RFID tag would be used in this design for the purposes of automatic identification and tracking. The tag will be located on the glove and would be able to individually track each employee's  physical status. The image below is an example of how a tag built into the glove would give employees the ability to log in and out. This 'logging process' serves as the means by which employees manage their tasks and tool usage.

This action ensures the employee does not cause additional stress to their body. Furthermore, the glove will also have utilize different types of grips to add additional support for the employee while they are working with tools. The fact that the grips are attached to the glove, gives employees a great deal of flexibility in terms of what tools they can use and personal preferences of holding tools a certain way.

Research
The video below outlines the features of a bionic glove designed by a leading orthopedic hand surgeon. I found this video to be highly informative as it covers all the major aspects of what our team needs to consider for the design of our interactive glove.


The video discusses the use of anatomical relief pads which are strategically placed to help even the surface contact of the hand, diminishing the natural peaks and valleys that cause blisters and calluses. Fatigued is dramatically reduced and it actually improves grip strength for people suffering from arthritis. Innovative webbed zones are designed to helped hands breath so they stay cool and dry. The lycro material also helps conform to the hand to ensure best fit, regardless of hand size.